Preamble
This article assumes you have some knowledge of virtual machines and have VMware Workstation installed. Visit https://www.kali.org/downloads/ and download the latest 64-bit ISO image as you will need this.
For me I always run Kali as a VM with an Anker USB adapter for my networking. I find bridge and NAT adapters on the VM very slow when performing port scans or other pen test work, for a lab this is not so noticeable.
I use persistent and non-persistent disks on my VM, this allows me to keep my Kali VM always functioning as I expected and no nasty surprises on test day. If I need to update Kali I enable persistence and update, if all appears well I update the snapshot and re-enable non-persistence again.
Spec'ing up the VM
With the RAM and CPU, I always go to 50% of my host machine, so in my case this will be 2 CPUs and 8GB of RAM. This should give your VM a good feel and make it very workable.
I use 3 virtual disks, as per the following example;
- 60GB for the primary
- 20GB for tools, will be assigned to /opt
- 20GB for home, will be assigned to /root
Configuring the VM
Launch the New Virtual Machine wizard, I always select custom and then ensure that I will install the operating system later so I don't get any of the automated install process from VMware Workstation.
When prompted select Linux as the OS and select Debian 8.x 64-bit from the drop down menu. The next step will ask you to give your VM a name, select something that suits you and click Next.
For the CPU I always keep the Number of processors as 1 and the Number of cores per processor to 2, if 2 CPUs is what you want to assign. I find this gives me the best performance from experience. The next page will ask you for the amount RAM you wish to allocate in my case this is 8GB.
Select the type of networking you wish to use and ensure the OS disk is set to 60GB. Click next accepting defaults for the rest of the wizard.
Create the 2 additional virtual disks at 20GB and ensure that you set the options as per the below image;
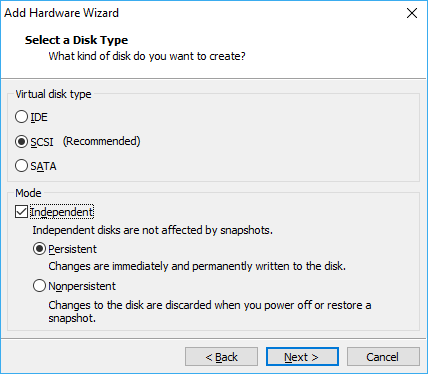
Do not alter the configuration for the primary virtual disk at this stage or you will lose the installation.
Installing Kali
Boot the VM from the downloaded ISO and select Graphical Install from the boot menu. Proceed through the installation select your preferred language, hostname and root password.
At the partition disks stage of the installation, ensure you select Guided use entire disk and proceed. For the entire disk ensure you select the 60GB disk which should be the first on the list. At the next stage select Separate /home partition and proceed.
On the Partition disks page select the next 20GB disk and click Continue, select yes to creating a partition table and you will return back to the partition disks page, repeat for the other disk.
Click on the FREE SPACE and Continue, then at the next page select the option Mount Point set click Continue and you will be asked which location to mount. I set the first 20GB disk to /opt which will be all my custom tools not included with Kali and the second disk as /root.
Kali does not have a standard user everything is run as root, so I remove the home partition and setup a bigger swap space to help with long running tools, here is my final result;
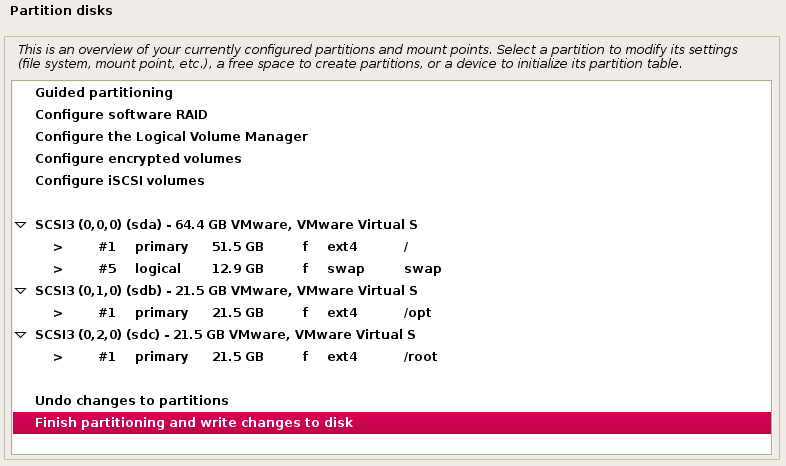
Having configured the disks in this way and later when you change the primary disk to non-persistent, means each time I revert to snapshot I can get a clean build again. However as my /opt and /root is on a persistent disk then none of my custom tools and outputs are lost (assuming you save your tools and output files in this way).
Proceed with the install of Kali as per the normal default options to completion.
Note: you might not have network mirror selected by default ensure it is selected when prompted. Else you won't be able to install new packages or update/upgrade. If you missed this you can add it after install by following this guide http://docs.kali.org/faq/kali-sources-list-faq .
Configuring Kali
Now that you have Kali installed, you need to login and get a few essentials installed.
Firstly you need to update and upgrade any existing packages in place, then finally update the distribution itself if needed, run the following command from the terminal;
apt update && apt upgrade && apt dist-upgrade
I found many updates were required after a fresh install, it appears the ISO image on the website is not updated often.
As we are running this as a VM we need to install the VM tools so we can copy and paste, also resize the screen correctly;
apt install open-vm-tools open-vm-tools-desktop
Log out and in again for the tools to take affect.
Then the final thing I do before setting my VMs primary disk to non-persistent is to pre-stage the database for Metasploit framework.
First you need to start the postgresql service as with Kali all network services are stopped by default;
service postgresql start
Then you need to tell Metasploit to build the database;
msfdb init
Completion
Now that is all done you can gracefully shutdown your Kali VM and set it to non-persistent.
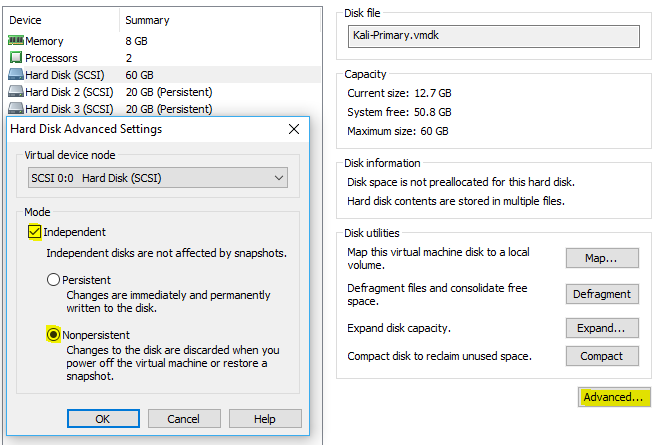
First you need to set the disk to be non-persistent, creating a snapshot before setting the disk to non-persistent will mean you can not alter the disk so ensure you do it the right way around.
To set non-persistent complete the following;
- Edit the VM settings
- Click on the primary virtual disk
- Click on Advanced
- Ensure you have a tick in Independent
- Ensure that the radio option is set to Nonpersistent
- Click OK and then OK again to save your changes
Before powering backup your VM take a snap shot I always place a date in the snapshot name myself so I can see how out dated my Kali VM is, I try to update it once a week.
Optionally you can now set under the Options tab in settings to be revert to snapshot after power off. This would see your Kali VM restored to base build each time you power off the VM. As the 2 additional disks are persistent they would have no data removed during the process. I always leave this option set to Revert to snapshot as I like to have a clean Kali build for each test I perform. You have to power off the VM for it to revert so don't worry if you need to reboot.
You now have a configured and ready to use a Kali VM, at anytime you feel Kali is requiring a kick you can click revert to previous snapshot and all will be restored to a base build with a clean state. Or if you set the optional setting mentioned earlier simply power off the VM.
There are many ways to setup a VM and Kali, this is just the way I do it and thought it would be useful to share.
Always interested to hear from people and their views, thanks for reading.